Are you the proud owner of a Blackmagic ATEM Mini encoder? Want to effortlessly stream your content through Quickchannel? Look no further!
This quick guide will walk you through the setup process, helping you unlock the power of streaming live content directly to Quickchannel from your Blackmagic Atem Mini Pro, Mini Pro ISO, Mini Extreme, or Mini Extreme ISO.
While these video mixers/encoders offer top-notch performance, configuring the stream channel requires a slight detour. Don’t worry, though! We’ll break it down step-by-step.
Understanding The Lingo:
When we say “channel,” we refer to the RTMP address – the unique destination where your video stream meets Quickchannel.
Ready to Set Sail? Here’s Your Roadmap:
- Download the ATEM Software Control: First things first, head over to https://www.blackmagicdesign.com/se/support/family/atem-live-production-switchers and download the latest version of the ATEM Switchers software. Install it on the computer you’ll be using with your video mixer/encoder.
- Locate the “streaming.xml” File: Time for a little treasure hunt!
- On your PC, navigate to C:Program Files (x86)Blackmagic DesignBlackmagic ATEM SwitchersATEM Software Control.
- On Mac, you’ll find it in Library/Application Support/Blackmagic Design/Switchers.
- Back Up Before You Leap: Before making any changes, create a copy of the “streaming.xml” file as a backup. You can rename it “streaming_backup.xml” just in case.
- Open the File: Now, use a text editor like Notepad (PC) or TextEdit (Mac) to open the “streaming.xml” file.
- Add or Modify a “Service” for Quickchannel: Here’s the magic touch! You can either add a new “Service” named “Quickchannel” or modify an existing one you’re not using.
- Quickchannel Magic: Inside the chosen “Service” tags, we need to add Quickchannel itself! Look for tags <service> and </service>. Between these tags, paste the following code, replacing the placeholder text with your actual Quickchannel information:
<service>
		<name>Quickchannel</name>
		<servers>
			<server>
				<name>Quickchannel</name>
				<url>YOUR_QUICKCHANNEL_INGEST_URL</url>
			</server>
		</servers>
		<profiles>
			<profile>
				<name>Streaming High</name>
				<config resolution="1080p" fps="50">
					<bitrate>9000000</bitrate>
					<audio-bitrate>160000</audio-bitrate>
					<keyframe-interval>50</keyframe-interval>
				</config>
				<config resolution="1080p" fps="25">
					<bitrate>7000000</bitrate>
					<audio-bitrate>160000</audio-bitrate>
					<keyframe-interval>25</keyframe-interval>
				</config>
			</profile>
			<profile>
				<name>Streaming Medium</name>
				<config resolution="1080p" fps="50">
					<bitrate>7000000</bitrate>
					<audio-bitrate>160000</audio-bitrate>
					<keyframe-interval>50</keyframe-interval>
				</config>
				<config resolution="1080p" fps="25">
					<bitrate>5000000</bitrate>
					<audio-bitrate>160000</audio-bitrate>
					<keyframe-interval>25</keyframe-interval>
				</config>
			</profile>
			<profile>
				<name>Streaming Low</name>
				<config resolution="1080p" fps="50">
					<bitrate>5000000</bitrate>
					<audio-bitrate>160000</audio-bitrate>
					<keyframe-interval>50</keyframe-interval>
				</config>
				<config resolution="1080p" fps="25">
					<bitrate>3000000</bitrate>
					<audio-bitrate>160000</audio-bitrate>
					<keyframe-interval>25</keyframe-interval>
				</config>
			</profile>
		</profiles>
	</service>
Don’t forget the details!
YOUR_QUICKCHANNEL_INGEST_URL: Find this address in your Quickchannel account under Settings > Live & Webinar > Live Channels. Copy the address you find in “Ingest URL” and paste it here.

6. Save the File: Once you’ve added the Quickchannel details, save the “streaming.xml” file.
Fine-Tuning the Stream:
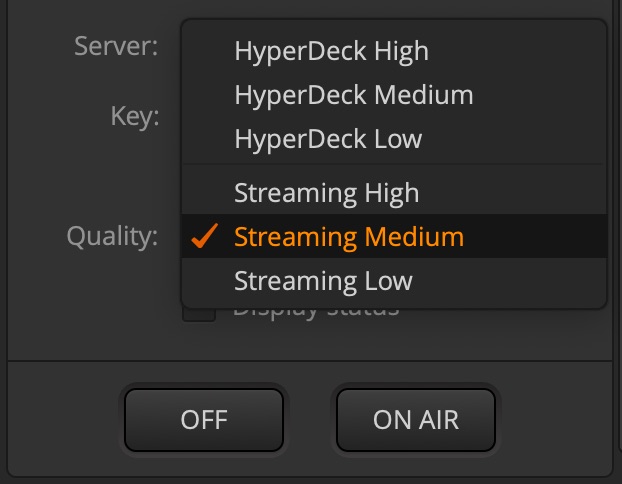
Bitrate Sweet Spot: Let’s talk about the bitrate of your video. This is allocated between the tags <profiles> and </profiles>. We’ve included 3 different profiles: Streaming High, Streaming Medium, and Streaming Low. While you can choose any, we recommend the medium quality for a good balance.
Streamlining Your Setup: If you’re solely using Quickchannel for streaming, you can delete the profiles you won’t use, keeping only the Quickchannel configuration.
7. Saving with Permissions: If you encounter a locked file issue, save the edited “streaming.xml” file to another location (like your Documents folder). Then, using your file editor or Finder, copy the file back to the original ATEM Switchers folder, replacing the existing one. Enter your administrator password if prompted.
8. Connecting and Streaming: Connect your ATEM Mini to the computer. The new service will automatically appear in the ATEM Software Control interface.
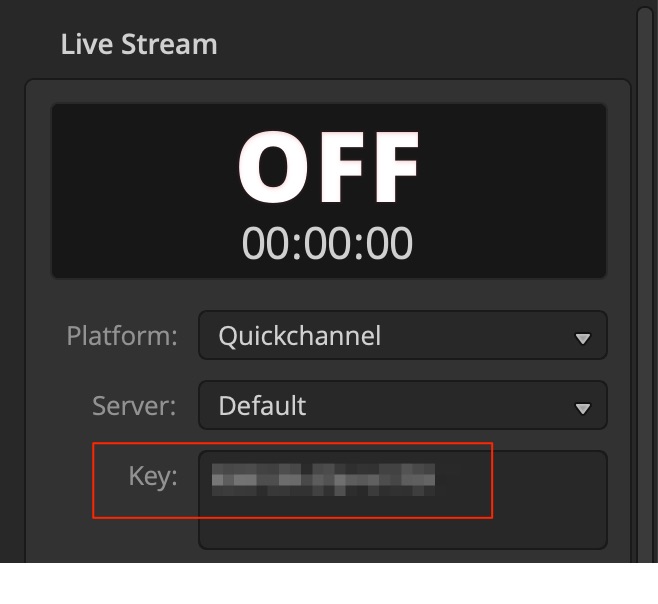
9. Keying In: Time to add the final piece! Find your “Stream name” in your Quickchannel account under Settings > Live & Webinar > Live Channels. Copy and paste it into the “Key” field within the ATEM Software Control. Choose the “Streaming Medium” quality, and you’re all set to stream!

Heads Up! Sharing Settings Across Computers:
If you plug your ATEM Mini into a different computer with ATEM Software Control, it might grab the streaming.xml file from there, overwriting your current settings.
To avoid any hiccups:
If you plan to use your ATEM Mini on multiple computers, make sure all of them have the same streaming.xml file.
You can copy the file onto each computer manually or explore cloud storage solutions for easy access.
This way, you can seamlessly switch between computers without worrying about losing your streaming configuration.
Happy Streaming!
With these steps, you’ve successfully configured your Blackmagic ATEM Mini to stream flawlessly through Quickchannel. Now go forth and share your amazing content with the world!
Elevate your video productions.
Expert guidance in:
- Strategy & Planning
- Studio Design & Build
- Production Support
- Professional Editing
- Audio & Video Mastery

