Are you looking to effortlessly gather attendee data in HubSpot and send unique viewing links to gain valuable insights into your events? Quickchannel’s integration with HubSpot simplifies the process, providing an efficient solution for managing your events and tracking engagement. Here’s how you can make the most of this powerful integration.
Getting Started with the Integration
Before you begin, ensure that you have set up the integration between Quickchannel and HubSpot. Instructions for this setup can be found in our knowledge base article: “Setting up the HubSpot integration”.
Setting Up Your Event
When setting up a live event in Quickchannel, navigate to the Registration section and enable HubSpot registration.
With HubSpot registration enabled, only email addresses will be transferred from HubSpot to Quickchannel and matched with the correct media ID. These email addresses will be used to send unique links to the event page, where the live event player will be presented. After the event, the engagement data connected with these email addresses will be shared back with HubSpot.
Creating a Registration Workflow
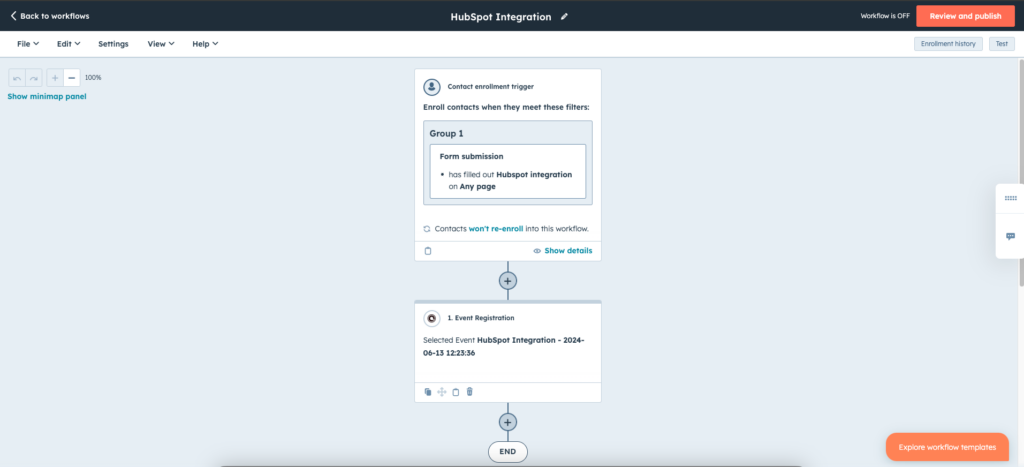
To send over attendee data to the correct media ID, you need to set up a registration form in HubSpot and create a contact workflow in HubSpot. Here is how you do it:
- Set Up Your Registration Form in HubSpot: Design the form to capture the necessary information from your attendees.
- Create a Contact-Based Workflow: In HubSpot, create a workflow based on contact information.
- Choose Form Submission as the Trigger: Select the form you created as the enrollment trigger for this workflow.
- Add a New Action: Select “Event Registration” from the Quickchannel section and choose the relevant live event.
- Publish the Workflow: Finalize and publish your workflow to automate the registration process.
Customizing Event Emails
Quickchannel will send a unique link to each registrant, allowing you to track viewer data and send it back to HubSpot. It is crucial to ensure that the email registration confirmation in Quickchannel is always enabled. This email can be sent out at any step in your HubSpot workflow.
If you prefer to manage all email communications for your event through Quickchannel while collecting submissions via HubSpot, you have that option. Customize your emails and reminders under Quickchannel Settings → Email notifications and turn on/off the reminders you want to send out, to maintain a consistent communication flow.
If you prefer all email communication except for the email with the unique email link, you also have that option. If you choose this option, disable reminder emails from Quickchannel except for the registration email by navigating to Quickchannel settings → Email Notifications to prevent flooding your registrants with multiple reminders. Decide through delay steps in your HubSpot workflow when you want the email with the unique link to be sent out to your registrants.
Analyzing Viewer Data in HubSpot
To analyze viewer data from Quickchannel in HubSpot, you need to create a HubSpot list:
- Go to the HubSpot menu Contacts → List.
- Filter on contact object and the integration filter.
- Select Quickchannel to view and segment data based on:
- Viewed time (hours, minutes, and seconds)
- Event titles (if multiple live events)
- Dates to filter events during a specific period
Conclusion
By integrating Quickchannel with HubSpot, you can significantly enhance your event management process, ensuring a smooth and professional experience for your attendees. You can read more about the integration in our knowledge base article: “Using the HubSpot integration”.
If you have any questions, feel free to contact us here.

